
Creating Stunning Pins in Minutes with Canva
- Ashok Meena
- Apr 16, 2024
- 9 min read

Want to grow your business on Pinterest but struggle to create pins that perform? Canva is an amazing graphic design tool that you can use to create stunning pins in just a few minutes.
To increase your traffic and leads from Pinterest, you should regularly post pins (images or videos) showcasing your content or products.
However, due to poor design, not all pins on Pinterest will be successful. These pins often fail to attract users, resulting in fewer clicks and less traffic to the linked web page.
Therefore, to master Pinterest marketing, you first need to master the art of pin design with Canva.
Read on:
In this step-by-step guide to creating stunning pins, we will look into what makes a good pin, how to design a pin with Canva, and how to share or publish it on Pinterest.
So, what is a pin on Pinterest, and what makes a good pin? Pins are images and short videos on Pinterest representing ideas, articles, products, food recipes, and more.
They appear in users' home feeds based on their boards, the people they follow, and the types of pins they love. There are other places, such as search results and sections, such as related pins, where pins are shown for a user.
A pin is more likely to perform better if it properly addresses the demand for an audience in a particular niche and attracts eyes through its amazing look and feel.
Therefore, how you design a pin matters greatly in drawing maximum attention and making it stand out among the thousands of pins on Pinterest.
A great pin design takes care of the following essential things:-
1. Target audience
When creating a pin, consider your target audience while selecting the background image and its color, writing the title, and using text colors.
Choosing images and keywords that align with the interests of your target audience, such as women, kids, and adults, is the way to design a viral pin.
2. Pin size
The first thing you must consider when designing the pin is its size. The size of the pins plays a crucial role in how they will appear on the platform. If your pin is horizontal, it will not appear properly, and the text may be cut off.
According to Pinterest's best practices, the ideal aspect ratio is 2:3.The best size you can use is 1000 X 1500 pixels.
3. Background image
Use only high-resolution images that are more relevant to your content. Pinterest downgrades pins with low-quality photos.
You can also add mock-ups for freebies and products to make your content more engaging.
4. Pin headline
Viewers see the pin title or headline first on the pin. Therefore, it should be eye-catching, engaging, and stand out.
This text overlay will help them understand what this pin is all about. Based on this headline, the users decide whether to click on it or not.
The headline text should also contain the main keywords from an SEO perspective.
5. Fonts and colors
Use color and Font contrast to draw the user's eyes to the most important parts, such as the pin's title.
You can induce color contrast to make the pin title more eye-catching than the background. For example, you can use light colors for the background and dark colors for the title.
The bold font is good for drawing attention to the title, while you can use light font for the rest of the text.
You can also create font contrast by using different font sizes. For example, you can use a big font size for the text you want to grab the users' attention.
6. Call-To-Action
If you want users to take action, a CTA must be on the pin. Providing a call to action can increase website traffic and lead to sales.
7. Branding
Branding helps to get more engagement and clicks. Over time, users start to recognize pins from a brand on the platform if they have a logo/url or colors specific to that brand.
For example, if the platform users have already seen your pins with valuable content or products when they recognize your new pin, they are most likely to try it.
8. Readability
Cluttered pins are not going to succeed. When users see such a pin on the platform, they instantly lose interest in it and start exploring other pins.
Therefore, the pin should have a manageable amount of text, making reading easy. It should have clear text overlays and enough white space between design elements.
The fonts for the main keywords should be large enough for users to see the texts clearly when scrolling the pins on mobile devices or small devices.
Now that you know what makes a good pin let's see how you can quickly and effortlessly create pins using Canva.
Creating pins on Canva is easy and fun. Even if you are not a professional designer, you can easily design stunning graphics for Pinterest.
First, if you don't have a Canva account, sign up using an email address.
There are two ways to create pins in Canva: modify an existing Pinterest template or design from scratch.
1. Creating stunning pins in Minutes with Canva by using templates
Using Canva templates is the fastest way to create a full-fledged stunning pin in minutes. You just need to search for and change the Pinterest template that best meets your pin requirements.
Canva has a wide range of Pinterest pin templates for various niches made by expert designers, and more templates are being added daily.
There are many bloggers and digital marketers on Pinterest who sell Canva templates.
Log in to Canva and go to the dashboard to use a template for pin creation. There, you can see a blue Create a design button in the top right corner of the screen.

Once you click on this button, a list of different design types will appear. This drop-down menu also has an option to search for any design type.

Now click on the Pinterest Pin(1000 x 1500 px) type, or you can type Pinterest in the search box and then select the pin type with size 1000x1500px. As shown below, you will be taken to a new Canva window(Untitled design—Pinterest Pin).

Next, you need to find the right Pinterest template more relatable to your content or idea. Multiple options exist to search and select the appropriate sample template for pin design.

You can type a few primary words in the search box to find the desired template or click on the Pinterest tab and scroll down till you find your ideal match.
Let's see how we created a pin to start a blog and make money.
To find the appropriate template on Canva, we typed digital marketing in the search box and hit Enter.
Canva displayed a scrollable vertical list of templates, including free and premium templates with a Pro tag.
We selected the below template from the scrollable list of templates on the left side of the screen.

First, we selected the background image of the sample pin and deleted it. Then, we searched for a different photo.
To find a new photo, click on Elements on the left side and then click on Photos. There, you will see photos recommended by Canva, and you can also search for photos by typing in the search box. You can also upload your own images from your device.
As shown below, we chose the photo and adjusted it on the pin. To set it as a background image, we selected the new photo, right-clicked it, and then sent it back.

We adjusted the background image's transparency so that the pin title stands out more.

Next, we made the title text bold, deleted the sample's brand name, and changed the pin's sub-title(supporting text to the main headline).
You can also use the Canva Magic Write tool to generate engaging titles. To access it, click the Magic Write icon at the bottom right of the design page, or you can type /.
This tool can help you improve your title. Just select the text box and invoke the tool. You will see many rephrasing options, such as Rewrite, Continue Writing, Summarize, etc.

We also added a call to action(Read Now) to generate a sense of urgency to visit the content and a website name(etraderevolution) for branding purposes.
This is how the new pin looks after making the above modifications.

We were able to create a pin quickly by customizing the existing template. You can personalize it by experimenting with different fonts and colors to align with your brand.
Additionally, you can include various design elements such as arrows, mock-ups for freebies, numbers, and more to make it more detailed and engaging.
2. Creating stunning pins in Minutes with Canva from scratch
Modifying existing templates is easy, but how do you create pins without using any pre-made template?
So here is the step-by-step process for creating a pin on Canva from scratch, using the example of creating a pin for the 20+ best AI writers for blogging in 2024.
First, on the Canva dashboard, click Create a Design and then choose the Pinterest pin(1000x1500px) option on the menu.
Once you select it, a new Canva window will open, and you will see a blank white canvas.
Alternatively, click Custom size, fill in custom width and height, and click Create new design. This will open a blank canvas in a new window with custom dimensions.
Now, go to the left sidebar and click on Elements to add a grid to the design. Frames and grids are important when placing multiple images on your pin.
For example, a recipe pin can have more than one image.
We are adding a single-frame grid since we are using only one photo in our example.

Next, go to Elements and click on Shapes to add shapes like circles, squares, and many more to show your creativity.
Here, we added one hexagon (for adding a number) and one square(for the title and other supporting text).

You can change the color of these shapes. Just select any shape and click the color icon at the top; a color palette will pop up.

Next, you need to add the background image. There are multiple ways to do this; for example, go to Elements->Photos and search for a relevant graphic. You can also find them under the Recently used, Magic recommendations, and Trending sections.
In the left sidebar, click Uploads to upload a photo from your device. We uploaded our photo, adjusted it on the grid, and sent it into the background. You can bring an image or shape forward and back by right-clicking it and choosing the appropriate option under the Layer menu.
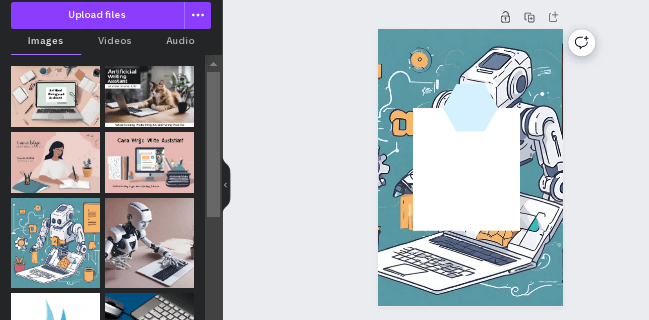
Now, click the Text icon on the left sidebar to add a number, headline, sub-title, call to action, and brand name. To insert text boxes on the pin, click on Add a text box, Add a heading, Add a subheading, or Add a little bit of body text.

We have used 5 text boxes to add a number(20+), title(Best AI writers for blogging in 2024), subtitle(Write blog post faster than ever), CTA(read more), and brand name(etraderevolution), as shown below.

You can do many creative things with photos and text to make your pin stand out on the platform.
You can adjust transparency and add animation and other effects to the background image. To edit a photo, select it and click the Edit photo button above it.
If you have many text and design elements and are having trouble aligning them properly, you can select all of them and use the position tool to align them in the center with one click.
You can use more than one font for text elements. To change the font of a text, select it and then access the drop-down menu above the pin. At the same time, you can change the color of the text by pressing the A icon.
Sharing pins directly from Canva to Pinterest
Once you have designed a pin, you don't need to manually add a pin to Pinterest or use a third-party scheduling tool; you can directly share it with Pinterest from Canva.
Canva has a seamless integration with Pinterest, so you can publish your pins directly as soon as you finish designing them. You can also download the image to add a pin to Pinterest manually.
To download the pin, click the Share button, click Download, and select the file type(PNG, JPG, PDF, etc.).
First, Click the Share button on the top right corner of the design page, choose the Pinterest icon, and then connect Canva with Pinterest if you have not connected.

Next, choose your board and fill in your pin's title, description, and URL. Now, hit the Publish button to publish it on Pinterest.

You can also save your pin as a template for later use or sell templates to others by creating a template link.
To create a template link, click on the Share button, click More, then choose Template link.
Conclusion
Creating visually appealing pins on Pinterest using Canva is easy. With your creative skills, you can make them stand out on the Pinterest platform.
Canva offers pre-made templates, which can save you a lot of time. However, since these templates are free, many other marketers use them too. So, if you want to create unique pins, you will need to look beyond them.
You can access millions of photos if you are a Canva Pro user. You can also browse through popular photo stock libraries like Unsplash and Pixabay to find fresh images for your designs.


Comments